The browser extension
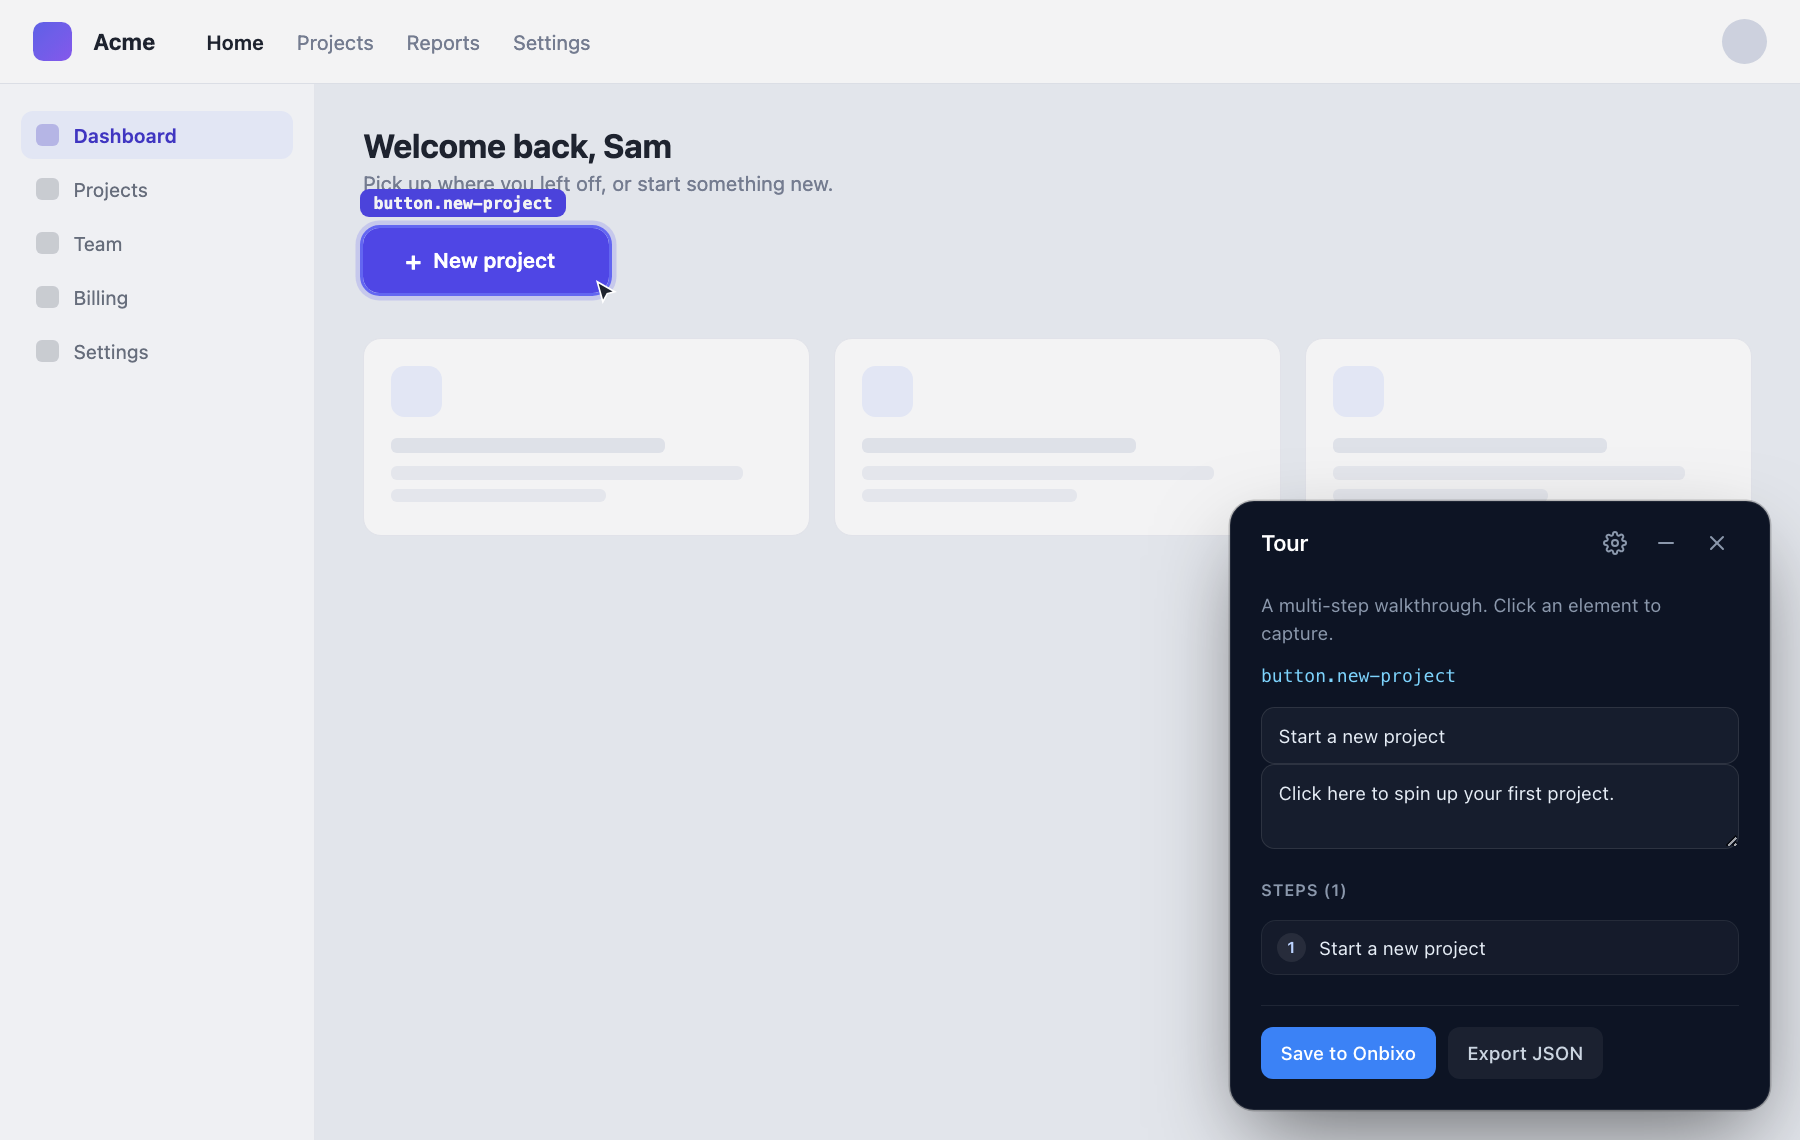
The Onbixo builder extension is the fastest way to create a flow: open your live app, click the elements you want to point at, and the extension captures selectors that survive your app re-rendering. It is the recommended way to build - no CSS, no engineering ticket. Pair it with the one-line runtime and you have the whole product: point at your app to build, drop one line to ship.
Why build with the extension
Tours and tooltips anchor to elements on your page. Typing CSS selectors by hand is fiddly and brittle - a class name changes, a wrapper moves, and the flow points at nothing. The extension removes that entirely:
- No code. You point and click on your real app instead of guessing selectors. This is built for PMs and founders, not just engineers.
- Selectors that survive change. Each click captures a ranked set of selectors, not one fragile string, so the target keeps resolving as your app re-renders (React, Vue, Angular, Svelte, or plain HTML). See Troubleshooting if a target ever stops resolving.
- You see exactly what your user will. You build on the live page, in context, not against a mockup.
Install it
The extension is not on the Chrome Web Store yet, so install it manually (one time):
- On the Install page, download the extension (.zip) and unzip it.
- Open
chrome://extensionsand turn on Developer mode (top right). - Click Load unpacked and select the unzipped folder.
- The Onbixo Builder icon appears in your toolbar. Pair it from the Install page.
Chrome Web Store listing coming soon. Once it's live, you'll install in one click and get updates automatically - no manual steps.
It is a standard Manifest V3 extension and requests the minimum it needs: access to the current tab when you activate it, and local storage for its pairing token. It does not run in the background or read your browsing.
Click the toolbar icon on any page to open the builder. It starts on a simple home screen: pick what you are building - a tour, tooltip, checklist, or just grab a robust CSS selector.

Pair it with your account
Pairing links the extension to your workspace so it can save drafts there, using a token that is scoped to that one job and nothing else. It takes two factors - your account email and a one-time code - so a code glimpsed over your shoulder or in a screenshot can't pair on its own. On first use, the builder shows a Connect card that walks you through it.
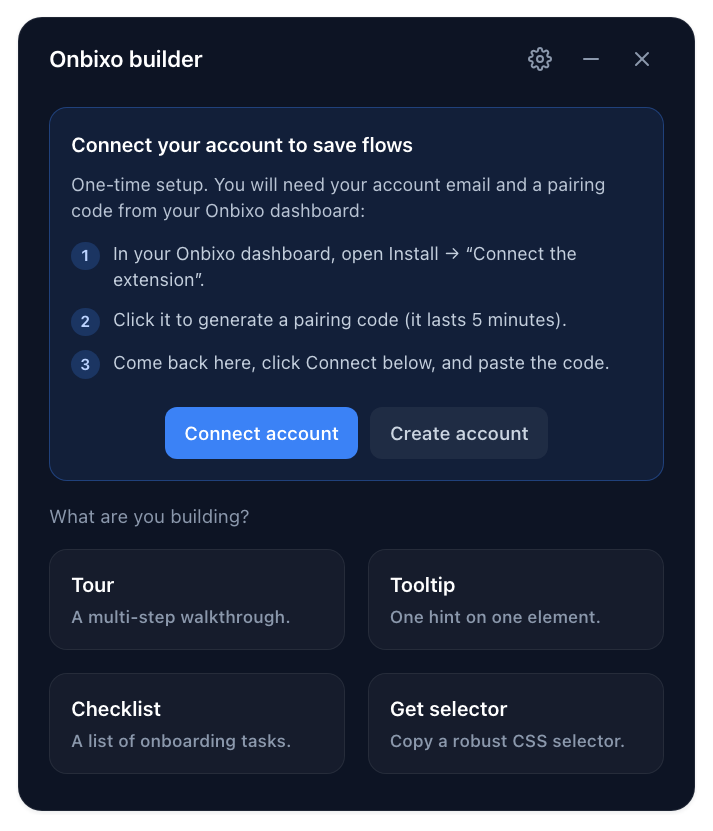
- In the dashboard, open Install → Connect the extension and generate a one-time pairing code.
- In the extension panel, click Connect account, enter your account email and the code, and click Link.
- The server checks that the email matches the account that minted the code, then issues a scoped, time-limited token, stored only inside the extension's service worker.

Use the email you sign in to Onbixo with. If you are a team member in someone else's workspace, use your own email - the code you generated is tied to you, and the extension links to whichever workspace was active when you generated it.
The token can only save flow drafts to your account. It never enters any web page, cannot read your data, and cannot act as your login. The extension's UI (the picker) and its network calls are kept apart - the part that touches your page never sees the token. If a token is ever lost, revoke it from the Install page and pair again.
Build a flow
- Open your live app and click the extension icon to turn the builder on.
- Hover an element - it highlights. Click it to capture that target and add a step.
- Write the step's title and body right there, and repeat for each element your tour points at.
- Click Save to Onbixo. The flow lands in your account as a draft.
- Open the dashboard, refine it in the visual editor (styling, targeting, frequency), and Publish.

The extension captures the targets and the step content; the dashboard is where you theme, decide who sees the flow and when, and take it live. Publishing always happens in the dashboard, never from the extension.
Where an element sits inside a shadow DOM or an iframe, the extension detects and flags that boundary as you capture it, so you know when a target lives in an isolated part of the page and may need a different anchoring approach.
Work across workspaces
If you belong to more than one workspace, the extension can stay paired to all of them at once. Open the settings cog (top-right of the panel) to manage connections and the panel's appearance:
- Switch workspace - pick another paired workspace to save into. It is instant; you do not re-enter a code.
- Add a workspace - pair a new one with a fresh code from that workspace's dashboard.
- Disconnect this workspace (or all) - revokes the connection so that browser can no longer save flows. You can also revoke any connection from the dashboard's Install page.
- Theme - the panel follows your system light/dark setting on Auto, or you can force Light or Dark.

How it fits the whole product
The extension is one half of what makes Onbixo quick to adopt. The other half is the runtime:
| Step | Where | What happens |
|---|---|---|
| Build | Browser extension | Point and click on your live app; selectors captured for you. |
| Refine & target | Dashboard editor | Theme it, choose who sees it and when, preview it. |
| Ship | One-line snippet | Drop the install snippet once; every published flow renders on your site. |
| Run | Hosted runtime | Your users see the flow. At runtime you can also drive it with the window.onbixo API. |
Export a flow (no account needed)
The panel's Export JSON copies a runtime-ready flow to your clipboard, so you can capture and test a flow locally without pairing. Pairing is only needed to save drafts into your account.
You do not have to use the extension - you can enter CSS selectors directly on any step in the editor. The extension is the recommended path because it captures more robust, change-resistant targets for you, but the manual route is always there for a quick edit or a power user. See The visual editor.
Last updated: Aug 5, 2026